Edge filler
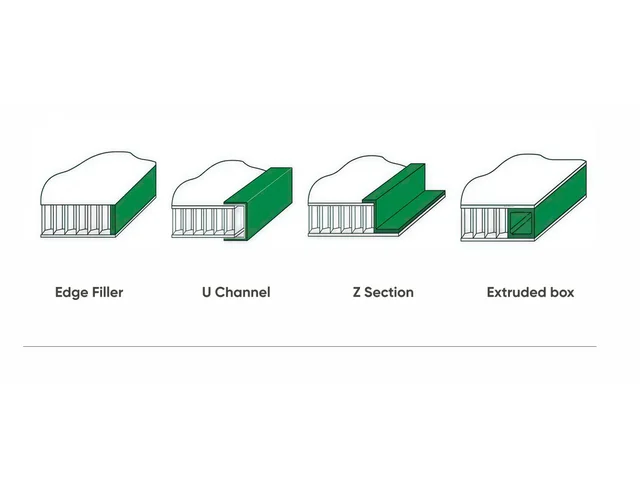
A filled perimeter for closing the exposed cellular core.

Technical Guide
Edge filler, U-channel, Z-section, extruded-box and folded-edge approaches for protecting the core and preparing panel perimeters for fixing or finishing.
Why the perimeter matters
An exposed honeycomb edge is not a finished connection. The perimeter detail is selected around appearance, water or debris exclusion, final sizing, stiffness, hardware loads and the way the panel connects to adjacent profiles.
Edge members and local inserts should be resolved before cutting and CNC work so drilling, tapping, hinges, latches and brackets land in a suitable reinforced zone. Exact extrusion, adhesive, weld and tolerance details are confirmed on drawings.
Catalogue options
These diagrams establish the type of detail to discuss. Final extrusion geometry, material, adhesive, weld, tolerance and fixing method are confirmed on the project drawing.
A filled perimeter for closing the exposed cellular core.
A channel cap that can cover both skins and the open core edge.
An offset section for a stepped perimeter or interface detail.
A closed perimeter member where a more substantial edge is required.
A strength- and weight-conscious insert enclosed by the face sheets.
Aluminium or timber insert used where drilling or tapping is required.
A perimeter arrangement that allows the panel to be squared to final size.
A folded skin closure commonly considered for wall and ceiling panels.
Engineering the interface
A neat edge cap and a hardware-bearing insert solve different problems. Mark every hinge, bracket, latch, handle, threaded fixing and exposed perimeter before panel cutting begins.
Drawing checklist
Technical enquiry
Include the panel construction, perimeter drawing, hardware positions, quantity and required factory stage. We will confirm the applicable edge approach and profile interface.